Showing posts with label in the kitchen. Show all posts

Friday, February 1

A healthy super-bowl snack


Don't get me wrong. I absolutely love traditional tailgate food. Mostly because it always includes something barbecued and something bacon. With all of those recipes floating around this time of year, I thought I'd throw something in the mix for my gluten-free/more health conscious friends. This recipe might seem like an odd pairing but I promise you- it is delicious.

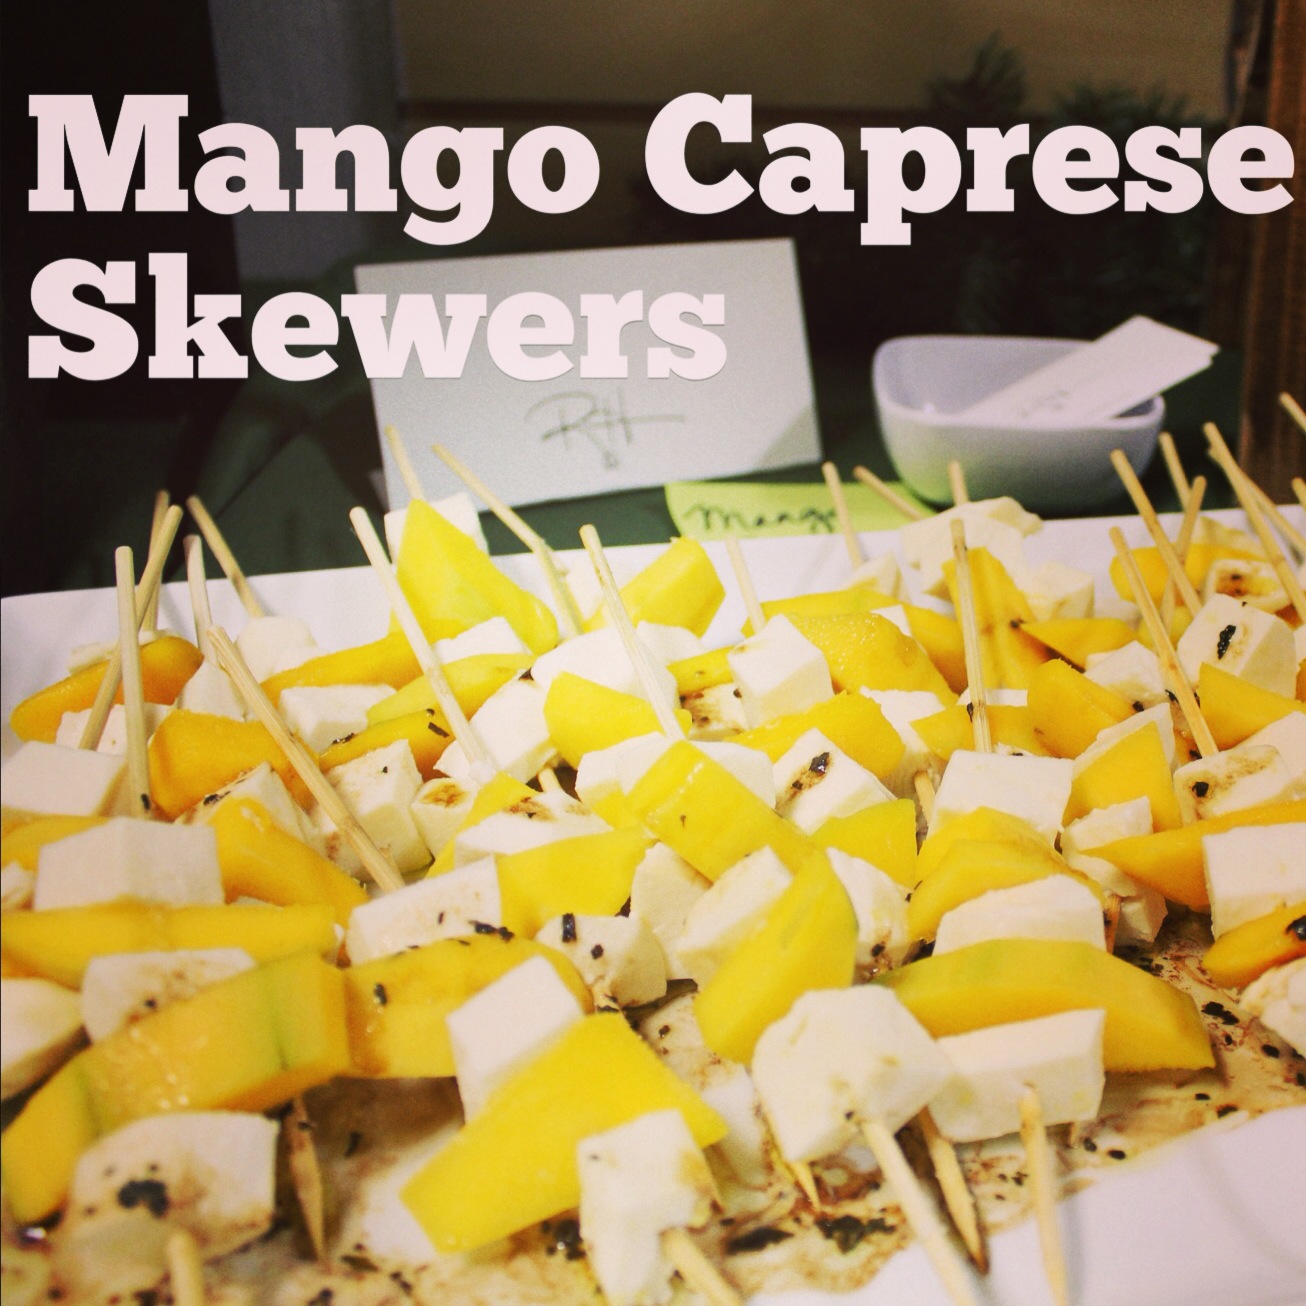
The original idea for this recipe stems from something that was made at one of my wedding showers. Made by Ben's aunt, the Mango Caprese Salad was a hit and something I've made many times since. Though, over time it has evolved in presentation. When I make it to take to work for lunch, I generally cube the cheese and mango and toss it in the dressing. Recently, for a holiday party over at Lilly Lane, I decided to put a twist on the recipe to make it group friendly (read: less likely to spread germs).

What you need to make roughly 2 dozen skewers:
2 Ripe Mangoes
24 oz. Fresh Mozarella

Dressing:
1/2 C. Extra Virgin Olive Oil
1/4 C. Balsamic Vinegar
1/4 C. Fresh basil, julienne sliced

The plan:
Chop your mangoes and mozarella into roughly 1x1 inch cubes. Alternate four cubes of each on a skewer. Mix all ingredients for the dressing and then pour over top the skewers. It's that easy.

In the photo above I ran short on fresh basil and had to use dried which was fine but not ideal. With fresh basil, you could even incorporate it into the alternation of cheese and mango. Either way you dress it up, this recipe is delicious and you should give it a try!


Friday, September 9

In the Kitchen: Last minute dinners

Last night's last-minute dinner battle.

Ever have those nights when you come home from work to a nearly empty refrigerator or pantry? Last night was one of those nights. We have our first CSA delivery (so excited) coming today so I have been holding off on going to the grocery store which has been economical but leaves us with very few ingredients for dinner.

It is these times where I do something dorkier than most. I play "Iron Chef" in my head. You may or may not know that one of my dreams in life would be to judge and Iron Chef (Original or American...I'm not picky) competition. I know. Nerd alert. Now you know one of my deep, dark secrets.

Anyways, last night I decided I had two bell peppers, brown rice, an onion and some frozen spinach. So I cooked up the rice, caramelized the onions and then when both were done threw in the spinach, salt, pepper, and some olive oil. I halved the peppers, put the rice mixture into them and then popped them in the oven at 350 degrees for about 25 minutes.

It was a fly by the seat of my pants kind of dinner but in the end the Judge's Council ruled it a success. And by Judge's Council, I mean Ben.

I would love to know, if you care to share, what you do when you are in a crunch at dinner time. Do you throw a few things together or have some go-to meals that you always on hand? Or do you just say "the hell with it" and order take out? I'd love to know!

Wednesday, August 31

In the Kitchen: Fall antici.....pation

Fresh from our garden.
I don't know about you all but this time of year is a bit of a dichotomy for me because I feel the urge to soak up every little bit of summer that is left yet, I can't help how excited I become for fall. I guess I should be happy that there is so much to celebrate during this time of year!

One of the latest harbingers of fall at our house is our butternut squash plant. This is especially exciting because this plant was a volunteer and just popped up out of nowhere. So far, it is one of the highest yielding plants for the whole year proving that mother nature does what she wants. Period.

I haven't used any of them yet because I feel like I need to wait until the weather (or at least the mornings and evenings) are a bit cooler and crisper. In the meantime, and during this period of beloved anticipation, I thought I would share a few butternut squash recipes that I've made in the past. Tested and approved!


Quinoa Pie with Butternut Squash and Sage- This is one of my very favorite recipes that is impressive in presentation, super tasty, and easy as...well, pie. No wonder considering it's a Martha Stewart recipe.

Curried Butternut Squash Soup- This is one of Ben's favorites and a fall staple around our dinner table. I especially like this recipe because it substitutes plain yogurt for heavy cream, making it a bit healthier. Although, my Aunt Consuelo makes a pretty phenomenal version using heavy cream that I will never, ever turn down. In the meantime, this one is excellent!

Caramelized Butternut Squash- This is about as close as I get to any type of sweet recipe including orange veggies. I'm not big on caramelized carrots or sweet potatoes with all that marshmallow mumbo-jumbo on them but this recipe, I like. It has the perfect sweet-salty mix that is irresistible and is a recipe that you can easily throw together using simple ingredients.

What fall recipes are you most excited to make?

P.S. Who all got the Rocky Horror Picture Show reference in the title of this post? Anyone...anyone? We are huge fans of Halloween around our house so I just had to put it in there.

Friday, August 26

In the Kitchen: How to use up a bumper crop of tomatoes

This is a post I wrote a few years ago for another blog and I still prepare my tomatoes this way at the end of each summer. I thought I'd share my little blast from the past with you, complete with photos from our old house! Oh, hey green kitchen walls- I miss you!

For all of you that have lots of tomatoes from your garden and you're not just sure what to do with them or you love sun-dried tomatoes but sometimes they can be expensive--this is the recipe for you.

Instead of laying your 'maters out to dry, bake them! This process takes a long time but if you time it right you don't even notice, plus it really is effortless and so worth it.

Step 1: Slice your tomatoes in half. If you are using anything larger than a Roma, make sure to cut them down to comparable size and take out a few seeds.

Step 2: Lay tomatoes skin down on a baking tray (I line mine with parchment paper for non-stickiness).

Step 3: Season them with a bit of olive oil, salt, pepper, and Italian spices.

Step 4: This is the long part. Set your oven at 150-200 ( or the lowest setting possible) and leave them in there for 12-14 hours. I start mine in the evening and let them go through the night.

Step 5: Wake up to beautiful and tasty "sun-dried" tomatoes!

BONUS: They can be kept frozen for up to six months!!

Wednesday, August 17

In the Kitchen: Spring Rolls

Ben and I love ordering spring rolls at our favorite Thai restaurant so I thought I would try to make them at home. This is a big step for me because I almost ruined the joy of eating pad thai after attempting to make it myself. I totally botched it up and have just recently started eating it while we are out again. Yep. It was that bad- pretty sure the mistake was due to my fish sauce misuse.

Anyways, these spring rolls turned out pretty well! They were light, refreshing and gluten free. You could also make them without the shrimp for those who have a shellfish allergy.

Here's the basic recipe although you can add whatever you like or happen to have laying around:


What you need:

Spring Roll Wrappers or Banh Trang
6 cooked shrimp, tail off and butterflied
2 cups of lettuce
1 cup shredded carrots
1 small red pepper, sliced
6 Thai basil leaves
Wasabi
Soy Sauce
Peanut Sauce
Hot water (not boiling)

The Plan:


Before making each roll, place one wrapper into a shallow bowl of hot water for approximately 30 seconds or until it is soft. Meanwhile, mix 1/4 cup soy sauce with wasabi to taste then toss lettuce in soy wasabi mixture. Lay wrapper flat on a cutting board then place lettuce, veggies, shrimp, and basil on the lower quarter of the wrapper. To wrap tightly roll from the bottom up. Once to the halfway point of the wrap, fold the side in and then continue rolling all they way up, sealing at the top. Serve with peanut sauce- we use San-J because it is gluten free and awesome!

Notes: I used the wasabi-soy mixture for the lettuce because Ben and I really like the kick of wasabi- but you could use a whole host of other dressings! Any suggestions?

I'd love to hear of any variations you all come up with! Enjoy!

Wednesday, July 27

Fresco del Jardin: Green & Gold Pesto Trio


Nothing is better on a summer evening than a little bit of pesto. It goes with anything, doesn't require you to fire up the oven, and there are so many fun and tasty variations!

To add a pop of color to my plate for last week's small dinner party,  I decided to make three different pestos that could be used to pair with the chicken or mix with the Zucchini ribbons. Having three different kinds helps to mix up each bite!

Let's start with the Pea + Mint Pesto. The idea for this came to me when my mom and I were at the Kokomo Farmer's Market during one of my visits home. Every year when I was growing up we would buy pounds of fresh peas from a local farm, shuck and freeze them for this winter. I actually loved this job because I really love the taste of fresh, raw peas. When I was helping her with the latest round the taste brought back some great memories and I knew I had to turn it into something new!

Pea + Mint Pesto

What you need:

4 cups fresh (or frozen raw) peas
1/2 cup fresh mint leaves
1/3 cup walnuts, halved
1/3 cup olive oil
salt and pepper to taste

The plan:

Whiz your peas, mint and walnuts in a food processor pulsing 3-4 times to get everything chunky and broken up. Next, turn the processor on and add the olive oil, slowly pouring it in as the ingredients become incorporated. Mix on high for a minute or so. Add salt and pepper to taste then give it one last whirl. Serve cold or store in the fridge for 3-4 days.

This unexpectedly, sweet and salty pesto not only makes a great dipping side but also goes well with a crudites platter or even as a sandwich spread. This recipe makes more pesto than needed for the trio but I enjoyed it days later with carrot sticks!

Next, let's move on to the basil pesto. This is a traditional pesto and I made it with a recipe I know by heart, if you will. There are SO many variations of this recipe out there but here is what I threw together:

Basil Pesto

What you need:

2 cups of Genovese basil
1/4 cup roasted pine nuts
1/4 cup Parmesan freshly grated cheese
1/4 cup olive oil
2 tablespoons lemon juice
Salt and Pepper to taste

The plan:

Whiz around the basil, pine nuts, lemon juice and cheese in a food processor. Over the next minute on high add in the olive oil until all the ingredients are incorporated. Salt and pepper to taste but remember the cheese is already salty so you won't need much more!

And finally, the piece de resistance, the Squash Blossom Pesto. I'll start this off by saying, this is not an original recipe, just a lucky find on another remarkable blog- The Runaway Spoon. I have to say, this is one of my favorite summer recipes that I have found! The earthy squash blossoms and salty Parmesan are such beautiful partners. I could eat this with a spoon but it was fabulous with the chicken. Be sure to check out The Runaway Spoon's recipe here for golden, glorious pesto of your own!

Check back later this week when we dive into another recipe from this plate!

Friday, July 8

In the kitchen: Pan-fried Oriental Eggplant with ginger and lime

Pan-fried eggplant along side Indian spiced quinoa

Each year we try to grow something in a garden that is more unusual than most things you can find in your local grocery store. This year, we went with Oriental  Eggplants and while we were excited about them- so were the insects in our area. Some type of insect all but decimated the leaves BUT we have still been able to garner one lovely eggplant so far.


Because this could be the only one of them that we grow this year, I wanted to make it into a side dish that would show off its taste and texture. I ended up cubing then pan-frying it and adding flavors that paid homage to it's eastern lineage. Here's the recipe:

What you need:
1 Oriental Eggplant, halved then cubed
1 Tbs. extra virgin olive oil
1 shallot, finely sliced
1 Tbs. fresh chopped ginger
1/2 tsp. red chili flakes
Juice of 1/2 a lime

The plan:
Over medium-high heat add olive oil, ginger and shallots. Once the shallots become soft, add your eggplant and cook until sides have become crisp and golden brown. Place in a bowl and toss with lime juice and chili flakes. Serve warm.

It really is that simple but between the zing of the ginger, heat of the chilis, and tanginess of the lime the flavors become more complex than the dish itself. I also love the crispy texture of the outside of the eggplant matched with the softer inside. Just one eggplant will make a small side for two people so increase the recipe quantity if you are luckier than us and grow/obtain more than one!

Friday, June 10

In the Kitchen: Roasted Sweet Potato & Veggie Tacos


Warm weather is a great excuse to pretend like you live in a place where it's this toasty and sunny all year round. And what better way to play the role than with food? This recipe is extremely easy and puts a vegetarian twist on the simple taco.

With just a few simple steps, you have a delicious, quick and pretty healthy meal that is perfect for just one or for many!

What you need:

1 Red Bell Pepper
1 Sweet Potato
1 Red onion
1 Yellow Zucchini 
2 Tbs Extra Virgin Olive Oil
1/4 tsp Chili Powder
1/2 tsp Cumin
Whole Wheat Tortillas

The Plan:

Preheat oven to 350 degrees. Cube sweet potato and zucchini. Chop Red Pepper and onion. Coat with olive oil, add spices, toss together and spread onto a baking sheet. Bake for 20 minutes or until tender. From there, wrap up your veggies in a tortilla. Add lettuce, advocado, and salsa to taste. This will make about 6 small tacos. 

A few tips:

I took 2 tablespoons of non-fat greek yogurt and mixed in a couple dashes of cumin and spread it on the tortilla before assembling the rest of the taco. It's a great non-fat sour cream substitute. For a warm and toasted tortilla place one in a hot oiled pan for 10 seconds then flip for another 10. For a thirst-quenching treat, pair these tacos with La Paloma or a Michelada.

Wednesday, June 8

In the Kitchen: Spicy Rhubarb Chutney

Straight from Abuela's garden!
Each summer we always snag our fair share of rhubarb between my Mom and Abuela's gardens so we have lots of rhubarb cobbler, crisp, pie, etc. Don't get me wrong. I absolutely LOVE any baked variation of rhubarb but it isn't the taste that I get tired of, it is the preparation. And to be frank, I'm not the baker in our house, Ben is.

I went searching for another use for my rhubarb and I really wanted something that could be used in a savory dish. This is a hodge-podge version of a few recipes I found and I'm very pleased with the outcome! Warning: it is pretty spicy, which we loved about it, but for those who like milder foods- be warned.

Please meet Rhubarb Pie's alter-ego, Spicy Rhubarb Chutney.

What you need:
2 cups packed brown sugar
1 1/2 cups cider vinegar
1 teaspoon ground ginger
1 teaspoon salt
1 teaspoon ground allspice
1 1/2 teaspoons cinnamon
1/2 teaspoon ground cloves
1/2 teaspoon black pepper
1/2 teaspoon cayenne pepper
6 cups rhubarb, cut in 1/2 inch pieces
3 small jalapenos, with seeds minced
2 teaspoons minced ginger
3 teaspoons minced garlic
1 cup chopped onion
1 cup golden raisins

The Plan:
In a large pot combine salt, spices, sugar and vinegar. Bring to a boil and stir to dissolve sugar. Add rhubarb, jalapenos, garlic, ginger, onion and raisins. Bring back to a boil, reduce heat and simmer until thick, stirring often, about 45 minutes to 1 hour.

A few tips: Keep an eye on your chutney as it cooks!! Just because it took 45 minutes for me doesn't mean that it will take that long for you. With all that sugar in there, you can easily scorch your concoction giving it a charred taste so make sure to check up on it and give it a stir regularly. We canned our chutney to enjoy all year long! It is particularly good on most sandwiches or paired with Manchego cheese on light cracker.

Any other savory or unique rhubarb recipes you have to share? I'd love to hear them!

Wednesday, June 1

In the Kitchen: Return of the Nutella Cookie

Last week, my Nutella Cookie recipe went over so well I decided to kick it up a notch and make it into a more summer-ish dessert.

Behold, the Nutella Ice Cream Sandwich.


To make these bad boys I just used the same Nutella Cookie recipe and added some chocolate chip ice cream. I thought long and hard about how I was going to make them look presentable so, after the cookies were baked and cooled I used a scalloped biscuit cutter and cut them into a more clean-cut shape. (Don't worry, I have yet another trick up my sleeve to use the baked cookie scraps!)

For the center, I spooned the ice cream into a standard muffin tray, filled the cups up about half way, smoothed the tops and popped them back into the freezer. This made them into a much easier shape to work with.


Once the ice cream was frozen, I assembled the sandwiches and put them back in the freezer to make sure everything stuck together.

 After testing these out on a few people I can verify that these are a true warm-weather hit!

Friday, May 20

In the kitchen: Nutella Cookies


Nutella. It's what's for dessert. Or a snack. Or breakfast. Or in your cookies, if you're around our house. I seriously can't get enough of it and sometime just prefer it by the spoonful.

A couple days ago I had a hankering for some fresh baked cookies but realized I didn't have any chocolate chips, rolled oats, nuts or dried fruit so I had to get creative.
<3
Here's the recipe for very simple Nutella cookies:

What you'll need:
1 1/2 C. flour
1/4  t. baking powder
1/4 t. baking soda
1/4 t. salt
1 C. butter
1/2 C. brown sugar
1/2 C. granulated sugar
1 1/4 C. Nutella
1 t. vanilla extract
1 Lg. Egg

The plan:
Preheat oven at 350 degrees. Combine the flour, baking powder, baking soda and salt together and whisk until incorporated. In a mixer, cream together butter and sugars. Add the Nutella, egg and vanilla to the creamed mix. Slowly add the flour mixture in at medium speed. Chill dough for 30 minutes. Roll into one inch balls and place on a non-stick baking sheet. Bake for 10 minutes and let cool completely.

Some helpful tips:
I let the dough chill while I cleaned up all the dishes which seemed to be enough time. I also wrapped it in plastic wrap  and then put it in a bowl so that in between batches I could press the dough back together into a ball to re-chill. I used a cookie scoop for part of the batch which gave them a cool contoured top and then hand-rolled the rest which ended up with a smooth top. I think I prefer the hand-rolled version because they look like daintier tea biscuits.

These cookies ended up a hit and helped me get my Nutella fix in without sheepishly eating it straight from the jar. Hope you like them, too!

Wednesday, May 11

In the Kitchen: Asparagus Soup

This weekend I bought way too much asparagus for Mother's Day lunch that we didn't end up using so I decided to make an asparagus soup. It was a bit of a fly-by-the-seat-of-my-pants kind of recipe as I was being lazy and didn't want to go to the store. Although, I think it actually helped the recipe because I had to get creative which made the flavors more complex. 

Because I used  a rue and some low fat Greek yogurt, I was able to keep the consistency thick and creamy without having to use heavy cream. There was only 1 tablespoon of butter and 2 tablespoons of flour in the entire recipe (which makes about 2 quarts) so I felt like it was a little healthier as a whole.

A word of warning, I had two pounds of asparagus to use so this recipe makes a lot of soup, which is great for freezing for later. However, if you're looking to make enough for just a few people, split the recipe in half.

Here is the recipe:

The first step
What you need:

2 lbs Asparagus, cut in one inch pieces
4 cups Vegetable stock (reserve one cup for the rue)
1 cups Greek yogurt
2 cups soy milk
1 large onion, chopped
2 Tbs lemon
1 Tbs butter
2 Tbs all purpose flour
Season with salt, pepper, garlic & basil (or anything else you fancy!)

The plan: 

Boil vegetables in 3 cups vegetable stock on medium high heat until asparagus and onions are tender. In a blender, puree stock and vegetables. In the same pan used to boil the veggies, melt the butter. Once melted whisk in flour until it becomes a brown paste (about 1-2 minutes). Be careful not to burn your Rue! On high heat add in reserved veggie stock, whisk together and bring to a boil (this will create a gravy like concoction). Add puree and milk, stir. Whisk in yogurt and incorporate. Add lemon and seasoning. Stir and simmer for 20-30 minutes on low heat, stirring occasionally. To garnish add grated Parmesan. I also added a little flat-leaf parsley from my herb garden to plate the dish.

The finished product.
 A couple tips:

I used and emulsion blender rather than an upright blender and pureed the veggies while still in the pot. It's my preferred method but it does add an extra couple of steps since you have to remove the puree from the pot to make the rue, then add it all back in again but I didn't mind. It actually helped me see where any remaining chunks of veggie were to re-emulsify.

I couldn't wait to try it so I ended up eating it hot, although if well chilled I think this could double as a great cold, summer soup. I picture it as a fabulous starter to any dinner party served in shooters with a crispy crostini or Parmesan cheese straw on the side or as a comforting after-work dinner.

To freeze in one batch, place in one large container. For individual servings, pour into muffin trays and freeze until solid. then remove solid soup servings and store them in one large container separated by parchment paper.

Wednesday, April 27

In the Kitchen: Empanadas de la "Wellas"


My Abuela and her sister, my Tia Bina, (affectionately referred to as "the Wellas") are two  of the most influential women in my life (I'm lucky to be surrounded by so many inspirational women) , especially when it comes to cooking. My Abuela is always eager to whip something up for us in the kitchen. As a kid, it was something I took advantage of, but now I find it endearing as hell. And, now that I have my own home, I totally get it. I must have that Spanish gene that makes you just want to stuff people's faces and warm their bellies with good food and conversation just like every other woman I grew up around.


One of my favorite dishes that Abuela and Tia Bina make is Empanada. Stuffed with sautéed veggies and meat, the smell of a cooking empanada totally reminds me of being at Abuela’s house anxiously awaiting to perform my official “taste tester” duties.


These can be made as hand pies by rolling a 5 inch circle of dough, filling it, then folding it over and pinching it together with a fork. However, when Tia and Abuela make them for the massive amount of family around, they use this more “casserole” like preparation.


Here it is, from my family to yours:
Empanadas a la “Wellas”

What you’ll need:

Filling-
3 lb. roasted pork, shredded
or 3 lg. cans of tuna, drained
3 red peppers
3 green peppers
1 lg. onion
2 cloves of garlic, chopped
1 bay leaf1 can whole tomatoes
1 6 oz can of tomato paste
½ Cup oil
Salt and pepper to taste

Dough-
6 Cups flour
1 Tbsp. salt
1 lb. unsalted butter
1 Cup milk
2 Tbsp. white vinegar
3 eggs
1 egg, beaten and reserved for egg wash

Filling: Cook onions, peppers and garlic in oil until tender. Add whole tomatoes, tomato paste, salt, pepper and bay leaf. Cook for 45 minutes. Remove bay leaf. Add tuna or pork. Drain and set aside
Dough: Mix salt and flour. Add butter. Mix like pie dough. Add eggs. Add the vinegar to the cup of milk. Add milk mixture to the flour mixture. Incorporate all ingredients then set aside.

Divide dough in half. Roll out half of dough and place in jelly roll pan. Add filling. Roll out second half of dough and place on top. Crimp edges with a fork to seal. Brush top with beaten egg. Bake at 350 degrees for 45 minutes, until top is golden brown. Once removed from oven, let it set for a couple minutes afterward.


I hope you all enjoy this recipe as much as we do. The smell of a freshly baked empanada is like a warm hug. I love how food connects us all in that way. What recipes do you remember growing up with?


Monday, February 7

In the Kitchen: Ben's orange brined pheasant

B has been doing a great job as an ecotarian, refraining from eating any meat that isn't local. And in this case, our pheasant was extremely local and a product of his Thanksgiving hunting trip.

This is probably one of my favorite dinners he has ever made. The brine made each bite succulent and utterly divine. B served it with rosemary roasted red potatoes and sauteed onions, which was a perfect pairing.

Here is his method of preparation:

2 small pheasants
1 1/2 gal water
1 cup  kosher salt
1 can orange juice concentrate
1 lemon, sliced
1 orange, sliced
5 cloves garlic, chopped
3 sprigs fresh thyme
1/4 cup fresh cracked pepper
3 tbs butter, melted
3 tbs maple syrup

Combine all ingredients EXCEPT for the pheasants into a large stock pot. Bring to a boil. Once brine has reached a boil take off the heat and let cool completely. Put your pheasants into the pot ribcage down and leave for 2 days rotating periodically. Once you are ready to prepare your pheasant to cook, rinse the birds off completely and pat dry.

To roast: Preheat oven to 450 degrees. Roast pheasant with potatoes, onions and olive oil for 15 minutes. Remove from oven, reduce heat to 325 degrees. Baste with 3 tbs melted butter 3 tbs maple syrup. Return pheasant to oven for 30-35 minutes or until an internal temperature of 155 degrees.

Friday, January 14

In the kitchen: Savory Oatmeal

Steel Cut oats have always been up there on my most versatile food list but for some reason, other than stuffing them in haggis, I never thought of making them in a savory fashion. I've put brown sugar, honey, milk, honey butter, preserves, and dried fruit all over oatmeal but lately, the craving for something a little more savory has reared it's head in the morning.

I did some research and one person had mentioned thinking of oatmeal more like risotto when you're looking to buck the sweet trend. So, that's what I did.

Here's the simple and quick recipe I came up with:

What you'll need:

Steel  Cut Oats
1 tsp. extra virgin olive oil
1 pinch of kosher salt
1 tsp. fresh grated Parmesan Reggiano

The plan:

  • Make your oats as directed. Most make more than one serving but I always do 1/4 cups oats to 3/4 cups water for a single serving. 
  • One your oats are done, transfer to a small bowl
  • Add salt, Parmesan, and olive oil
  • Enjoy!

Thursday, January 6

In the Kitchen: Salt Crusted Fish


This New Year, B has decided to be as ecotarian as possible, which I find to be an extremely admirable goal. Basically, he's trying to stay away from meat that isn't local or he hasn't hunted himself (ie venison, pheasant, and other things in our chest freezer). Environmentally friendly species of fish, however, are still on the list which is cool with me because I prefer seafood anyways. One my favorite ways to prepare fish is to bake it in a salt-shell so in honor of B's New Year's resolution, here is my method of preparation for salt-crusted fish.

The first time I had this dish was when I was in Torremolinos, Spain and I absolutely fell in love. Not only is it tasty, but it is a great dish to prepare when you have company over. The time it takes to bake the fish gives you ample time to hang out with your guests and it is an easy crowd pleaser that is sure to impress.

 Here is how I go about making Salt-Crusted Fish:

Start by finding a great seafood department. This dish is typically made with a whole fish (scaled and gutted) but if you don't have a local fish monger at your fingertips you can also grab two large fillets and put them together (skin side out).

Now, to the preparation:

This is what you'll need: A nice sized whole fish or two fillets stacked together skin side out, about 2 lbs of kosher salt (mix this with 1/3 cup water and you've got your salt mix!), 1 lemon, herbs of your choice.
  • Pre-Heat oven to 475 degrees
  • Line your pan with parchment paper
  • Make a bed of salt 3/4 of an inch thick for your fish to lay on
  • Slap your fish down on the salt
  • Fill the cavities of the fish with lemon slices and your favorite herbs (I like to use fresh oregano, sage, and basil from my garden)
  • COMPLETELY cover the fish with salt, packing it into a nice mound
  • Pop it in the oven, leave it for 45 minutes or until the salt gets a nice brownish crust on it
  • Use some heavy kitchen utensils to crack open the salt
  • Behold the tender and juicy goodness that is your salt-crusted fish and serve
An important note:
Make sure to use a non-endangered species of fish! Many seafood species have become drastically over-fished and are about to become extinct. For a great way to make sure your seafood is sustainably sound, check out the system the fine folks at Monterey Bay Aquarium are using to make these decisions easy for all of us.

P.S. Thank you Haley, at Haley O'Brian Photography for the photos!

Tuesday, January 4

Caramelized Onion and Brie Puff


Ever since my post on hosting my first Thanksgiving I've had quite a few friends ask about the caramelized onion and brie puff that I served. Turns out my family liked it too because I made THREE more throughout the holiday season.

So, due to popular demand, I give you directions to making a spectacularly cheesy and onioney brie puff of your own.

Originally, I followed Claire Robinson's recipe from her Food Network show, 5 Minute Fix. However, she makes two 5 inch puffs while I like to make one 7 inch puff. Here is her recipe with a few changes to make it a single recipe.

What you'll need:

  • 1 tablespoons unsalted butter
  • 2 large Vidalia or Spanish onions, thinly sliced
  • Kosher saltand freshly ground black pepper
  • 1/2 cup water
  • 1 sheets frozen puff pastry, thawed
  • 1 large round brie cheese
  • 1 large egg, lightly beaten
The Plan:

Preheat the oven to 400 degrees F.


Melt the butter in a large skillet over medium-high heat. Add the onions, season with salt and pepper, to taste, and saute until just brown, about 10 minutes. Add 1/2 cup of water and cook stirring often, until dark golden brown and creamy, about 25 minutes. Let the mixture cool to room temperature.


Roll a sheet of pastry to a 12-inch square on a marble surface or parchment paper to prevent sticking. Place the caramelized onions evenly  in the center of each pastry. Put a brie round on top of the onions and brush edges of both pastry squares with beaten egg. Fold pastry up and over cheese to completely enclose the cheese in the pastry. Press the seams together to completely seal.

Flip the puff round, seam side down, on a silicone mat or parchment lined baking sheet. (If you have it, this bakes exceptionally well on stoneware too!) Brush the top of each pastry round with beaten egg. Bake until golden brown. 20 to 25 minutes.

For a decorative flair, I like to cut off a small corner of the puff pasty and make simple leaves and stick them to the top of my puff with the beaten egg

An important note on serving: Make sure you let the puff cool for around 30 minutes before slicing into it. This might be the hardest step of all considering how good it will look and smell, but should be followed to prevent a molten stream of lava-like cheese from spilling out all over the plate and becoming completely separated from the pastry shell!

Enjoy!

Wednesday, June 2

In the Kitchen: Summer Quinoa Salad

Now that the weather is consistently much warmer, it's time to start preparing cold summer salads. I absolutely love summer salads because so many veggies are available and I get to be creative with all the new stuff in my garden.

One of my favorite salads of all is Quinoa Salad. Quinoa (Kee-no-uh) originated in South America back around some odd 6,000 years ago. The Incas actually believed the crops to be sacred, calling them "chisaya mama" or for those of us that don't speak Incan, "Mother of all Grains". They treated it so much like a diety, that when the Spanish Conquistadors showed up they actually forbid the indigenous people to grow quinoa and switch their crops to corn instead. Talk about being a little xenophobic. I mean, who is afraid of a type of grain? Really? Anyways, quinoa is chuck full of protein (12-18%) and unlike wheat or rice it contains a balanced amount of amino acids.

This is a great side with grilled meats but sometimes I like it just on it's own.

Here's the recipe!


What you'll need:
1 Cup quinoa (Good Earth has the best price in their bulk section, remember to buy local!)
1 1/2 Cups water
2 Tbsp Olive oil
1/2 herb of your choice (I like to use basil or cilantro)
Any assortment of fresh or frozen veggies of your choice ( Usually throw in a cup of corn, red onion, peas, carrotts and tomatoes)

The Plan:
Throw your quinoa and water into a covered pot and bring to a boil. As soon as the water starts boiling, turn your heat to low for 20 minutes. Don't take the lid off until its done (I always have a hard time with this step, but it's worth it). Your quinoa will end up the consistency of couscous.

Put your quinoa in a plastic bowl and put it in the fridge until it cools (or freezer for a quick chill). Once it has cooled down, add the veggies, herbs, seasonings, salt, and pepper. Stir. Done.


Enjoy!

Saturday, May 29

Summer Drink Recipe: Micheladas

After a long day at work, or even a hot afternoon full of work in the garden, Micheladas always hit the spot when I want something a little more refreshing than a plain old beer. This is a recipe I shared last year with the 30k Millionaire Crew and it was a hit!

Michelada's date back to around 1940 and are typically a version of Bloody Marys but with Mexican beer instead of vodka. Traditionally, they have ingredients such as clamato, salsa, and Maggi (a Nestle's brand variety of tomato soup). If it has any type of hot sauce included, it is usually referred to as a "Michelada Cubana".

As a self-pronounced amateur foodie I am normally jazzed when food is at it's weirdest state, however I prefer the boring version of Michelada referred to as "Michelada Regular". It is simple, clean, refreshing and totally undemanding when it comes to dinero. Sometimes you really can't beat that. Especially when you are pairing it with the kickin' flavors associated with tasty Mexican cuisine. Follow the recipe below and fall in love with a new Mexican favorite.


The super simple plan:
Throw in one bottle Mexcian Beer (use something lighter like Corona or my personal favorite, Pacifico) and the juice of two lemons. Mix and pour over ice. Rim the glass with Salt. ¡Ole!

Wednesday, April 7

Greek Yogurt, gift from the gods


There are lots of ways to substitute ingredients to make a meal healthier. Some use honey instead of sugar, egg beaters instead of eggs, and the like. My favorite substitute ingredient, by far, is greek yogurt. It has less calories than sour cream and/or mayo but totally does the trick for me when it comes to taste. For a quick read on what makes greek yogurt what it is, hop on over here.

These are a few of the ways that I like to incorporate greek yogurt into a recipe:

For a quick dip:
1/2 cup greek yogurt
1 pack French Onion Soup mix

Stir and serve!! It really is that easy.

Fake curry leftover lunch break:
1 cup cooked basmati rice
1/2 cup frozen peas and/or any other veggies you would like
1/4 cup greek yogurt
1 tsp curry powder

This is how I make it for a mid-work lunch break:
Throw your cooked rice (usually leftovers in our fridge) and frozen veggies into a container (love these because they are so stack-able!) . In a separate container, mix your greek yogurt and curry powder together. When you get to work in the morning, throw both into the fridge. At lunch, nuke your rice and veggies for two minutes then add your curry yogurt on top and stir together. Add last night's grilled/roasted chicken if you like!

Greek Yogurt Egg Salad (from The Greek Gods):
4 chopped hard-boiled eggs
1/2 cup chopped pimiento olives
2 tsp finely chopped green onion
2 tsp mustard
1/4 cup greek yogurt

Mix it up and spread it on your bread of choice!

I like to also mix in whatever spice I'm feeling at the moment then add a dollop of yogurt to baked potatoes, tortilla espanola, in my chili, and on top of baked chicken. Really, the possibilities are endless!

Overall, my favorite type of greek yogurt comes from The Greek Gods. They have a wide range of different flavors and sizes. All of their products are also gluten free!
Related Posts Plugin for WordPress, Blogger...